I have always loved looking for bulletin board decoration ideas for my classroom (at one point, future classroom!) on Pinterest. I have also gained many ideas from the teacher Instagram community!
I cut out all of my letters on my Circut Expression. I purchased it my first semester of college, Fall of 2014. That machine is no longer available, as far as I know. I have a Cricut Explore that I started to use more this school year (2018-2019). I then laminate all the letters/words for future use! Saving myself time and money for the future! 🙂

September 2017
Materials: construction paper, paint, yarn, scissors, tape to hang.
I had each child pick their favorite color paper and paint for their hands. We painted their hands and punched the papers–2 whole punches on each side. I cut yarn to fit so we could tie it all together!

October 2017
Materials: paint, white construction paper, googly eyes/eye stickers, chalk, and tape to hang.
Do each child’s handprint (excluding the thumb) twice, with the palm overlapping. Once dry, cut out the handprints and add eyes!
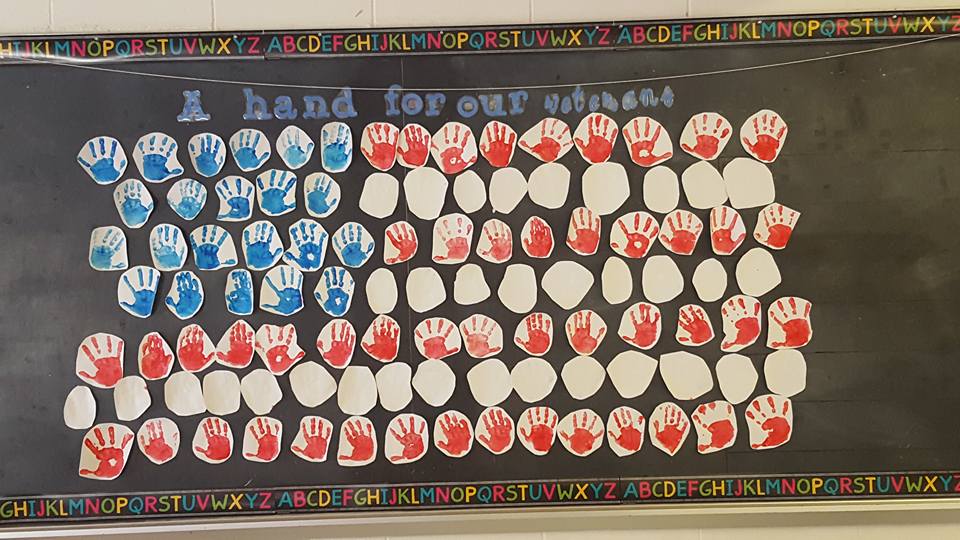
November 2017
Materials: red/white/blue paint, white construction paper, tape to hang.
Make as many handprints as you can in red, white, and blue. Cut out and assemble as a flag!

December 2017
Materials: tinfoil, scissors, coloring utensils, ornament template, green/brown/white/red construction paper, and tape to hang.
I printed out ornaments, wrote a name on each one, and had the children color and cut out their ornament. I made a crooked tree from construction paper and cut out a star from tinfoil. The Grinch’s arm is red paper and a white squiggly shape, along with a hand I Googled and traced! The hand is holding my ornament.
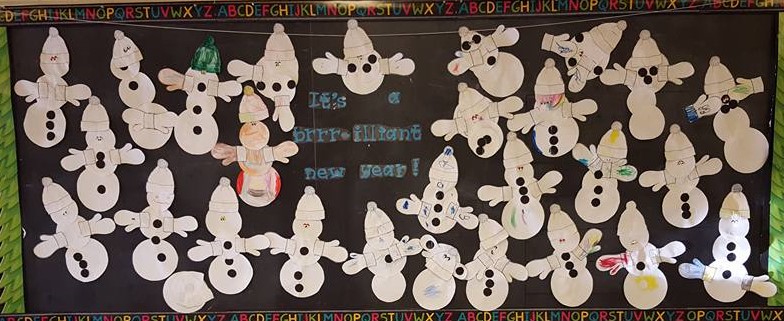
January 2018
Materials: black construction paper, whole punch, coloring utensils, hat/mittens/circle templates, scissors, glue, and tape to hang.
I designed 3 sizes of circles for the snowman body–white circles with a black outline. For the buttons, I made 3 small black circles. I Googled a hat and mittens. The kids cut out the circles for the snowman body. I cut out the hat, mittens, and punched out the buttons to save their little hands. They could have punched buttons out of black paper, next time! We did this project over 2 days–they are still little! They colored and glued however they saw fit!

February 2018
Materials: Pink construction paper, red paint, scissors, water, washtub, washcloths, and tape to hang.
Paint both feet, pressing on the paper one at a time, with the heels on top of each other. (You can paint only one foot, I had some kiddos that didn’t want both feet painted.) If you don’t have a sink in your classroom like me, I suggest having a plastic dish washing tub filled with water and a washcloth for each child.

March 2018
Materials: twine, scissors, clothespins, coloring utensils/Discount School Supply Chubbie markers (like bingo dabbers).
I purchased the sock template from SloanDidIt on TPT. The children decorated their sock with dabbers and cut the sock out after it was dry. Hang on twine with clothespins.
Link to sock template: https://www.teacherspayteachers.com/Product/Fox-Sock-Seuss-Creative-Writing-Activity-4386519

April 2018
Materials: Butcher paper, brown paint, paintbrush, sand, and tape to hang.
We had a lot of snow days, so this one didn’t turn out exactly how I was picturing. The kids love painting their own hands so they were all for it!
*To add an extra element, I added sand to the brown paint for some “muddy” texture.*

May 2018
Materials: Yarn, scissors, coloring utensils, kite template, and tape to hang.
I copied a kite template for each child. The children cut and decorated their kite! They picked their yarn and with some assistance, cut the string and taped it to their kite.

September 2018
Materials: shoe template, scissors, coloring utensils, and tape to hang.
This is completely child-led. The kids decorate a shoe and cut it out however they see fit!

October 2018
Materials: black construction paper, chalk, glue, q-tips, and tape to hang.
Each child gets a piece of black construction paper and draws a self-portrait with white chalk. When their self-portrait is complete, they “trace” it with glue (the best they can–some of these kids aren’t even 3 and some are 6), and stick q-tips on!

November 2018
Materials: acorn template, coloring utensils, scissors, laminator, and tape to hang.
The kids cut and colored their acorns.
I made the tree with clip-art, printed it poster-size from Adobe, cut it out and laminated it! I learned this trick from @msthorntonsthinkers on Instagram–she has a tutorial saved in her highlights!

December 2018
Materials: photo paper, camera, white construction paper, brown paint, paintbrush, red pompoms, hot glue, glue stick, and tape to hang.
Have the children paint their hands and stamp on white construction paper. Cut out. Take a picture of each child, print on photo paper, hot glue a red pompom for the child’s nose. With a glue stick, glue on the cut out hand prints. TIP: put the left handprint on the right side of the picture, put the right handprint on the left side of the picture.

January 2019
Materials: Black/white/orange construction paper, glue, white crayon/chalk, scissors, Fiskars Squeeze punch–1 inch and 1.5 inch, and tape to hang.
I cut out the body of the penguin for my 3’s, my 4’s cut out the shape I traced. I cut the orange triangle beak for my 3’s, my 4’s cut their own triangles. I used the same shape as the penguin body to make the feet on orange, obviously much smaller. With the 1.5 inch circle punch, my kiddos punched two white circles. With the 1 inch circle punch, they punched two black circles. They glued the black circles on the white circles to make eyes. They glued the eyes, beak, and feet on to the penguin body and colored a white belly with the chalk/crayon.

February 2019
Materials: puzzle piece templates, coloring utensils, scissors, sharpie, and tape to hang.
My plan was to make an actual puzzle, but we had a Polar Vortex with cold days (and sick kiddos) at the end of January and my plans just didn’t happen! The kids picked their piece and I wrote their name in Sharpie. They decorated how they wanted–some used dabbers, kwik stix, colored pencils, crayons, markers, paint, etc. I had intended the 4’s to cut their own since it wasn’t going to be an actual puzzle, but we had a blizzard. So I cut all the pieces on my own.

March 2019
Materials: Lucky Charms coloring pages, coloring utensils, scissors, and tape to hang.
Each child picked their Lucky Charm, colored it, and cut it out.

April 2019
Materials: butcher paper, green/blue paint, paintbrush, Sharpie, and tape to hang.
I drew a circle (kind of 😂) and the kids painted their hands and stamped them all over the Earth. My 3’s used one color and my 4’s used the other.

May 2019
Materials: white copy paper, scissors, cupcake liners, glue, markers, camera, photo paper, printer, and tape to hang.
Each child selected a cupcake liner and “fringed” it by cutting it with a scissors. They then glued the bottom of the liner to the paper and drew a stem and leaves with a marker. I took a headshot of each child and printed it on photo paper. Once I cut it out, I taped the picture inside the cupcake liner! (The flowers with the black dots are covering the pictures that I had already placed. Then I remembered I should take a picture before all of those little faces were glued in! 🙂 )
I plan my year out for classroom doors/bulletin boards in the summer. Then I cut/laminate all of the phrases I need so I’m prepared for the year and don’t need to scramble last minute. I also save all of my phrases in shoebox totes, along with cubby tags, for each month!